Quick Journal: Pamphlet Stitch
Happy New Year!
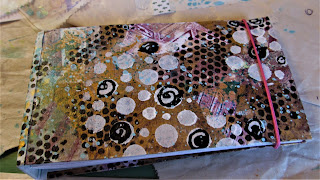
I made this journal today in response to Pam's request on my first post. It is a quick journal using leftover bits of the mailing envelope that I used for the last journal, ugly scrap book papers, and some gelli prints. I plan to use it as a glue book.
I really like using the pamphlet stitch. It is a quick binding method and relatively simple. My elementary students use this stitch to create their own sketchbooks each year.
For this journal (and the junk journal I made the other day), I did the pamphlet stitch 3 times in order to have 3 signatures.
Here is a photo of the finished journal. My step-by-step process pics are below.
I used a mailing envelope for my cover. I glued the two pieces together at their original fold, so I did not have to create my own score lines.
I used gelli printed papers to collage over the front and back cover.
After it was completely covered in paper, I added some sprays and paint through stencils.
I neglected to photograph the next step, but I glued two pieces of paper (3.25 x 6 inches each) to the inside of the front and back cover to hide the mailing envelope and the collage paper bits that folded over. I also glued a piece of paper (slightly wider than the spine) over the outside and inside of the spine.
I created a quick template to make the holes in the spine. I put a mark in the middle and then one inch out on either side of the center mark.
Since I wanted 3 signatures, I made the template so that it had 3 rows of holes, evenly spaced.
I lined up the template and used a pokey tool to make the 9 holes.
In this photo, you can see the paper I used to line the inside cover of the journal, as well as the 9 holes.
For the signatures, I cut some not-so-pretty scrapbook papers down to 3.25 x 12 inches, then folded them in half.
I separated the folded papers into 3 signatures.
Then I used the template to poke 3 holes through the folded center of each signature.
These signatures are now ready for binding onto the cover (using the pamphlet stitch).
To determine the length of string you need, you wrap it around the height of the book 3 times. I happened to have some already cut from the last journal I made, and it was enough to bind all 3 signatures.
To begin the pamphlet stitch, you put the needle through the center hole of the signature and spine. Whether you start from the inside or the outside of the spine depends on where you want your knot to be. I wanted the knot to be on the inside, so I started by putting my needle through the center hole from the inside of my first signature. You do not tie a knot until you have finished the binding, so leave a few inches of string.
From the outside of the spine, go through the top or bottom hole (doesn't matter which), bringing the needle back to the inside of the signature. You never go around the top or bottom of the spine. The needle ALWAYS goes through a hole to get back to the inside or outside of the signature.
Now that the needle is on the inside, it needs to go through the last hole (top or bottom - opposite from the one you chose last time), bringing the needle back to the outside of the spine.
At this point, I make sure I pull the string tight. (Note: in the above photo, the needle is still on the outside of the spine).
The needle now needs to go back through the center hole, to the inside of the signature.
Once the needle is back inside the signature, you are done with it. You can remove the needle from the string. Note that the string isn't doubled over like in sewing, so you can just pull the needle right off. At this point, both ends of the string should be on the same side of the signature.
I tie the knot around the binding, so it can't get pulled through the knot. Clip the ends. If you choose to have your ends on the outside, you may want to leave them long in order to hang embellishments from.
This is what the outside of the spine looks like after sewing in one signature.
This is the spine after sewing in all three signatures.
Here you can see each signature and where they connect to the spine.


Omg, I'm so glad I came back for a visit and saw this tutorial. I think I finally understand the binding process using multiple signatures. Now, to get started! ;)
ReplyDelete